
How to Save Seeds From Your Garden: Tomatoes, Beans, Peppers and More
Which seeds are easy to save, why hybrids don't come true, and step-by-step methods for drying, fermenting and storing seed for next year.
On this page
Saving seeds closes the loop in a home garden. Instead of buying new packets every year, you keep seed from your best plants, and over a few seasons those plants adapt to your soil and climate. It is also one of the simplest ways to reduce packaging and shipping, and to keep heirloom varieties alive.
Not all seeds are equally easy to save, and a few basics about plant breeding will save you from disappointment. This guide covers what to save, how to do it, and how to store seed so it stays alive.
Open-pollinated vs. hybrid
Check your seed packet or plant label before you plan to save seed.
- Open-pollinated (OP) and heirloom varieties produce seed that grows into plants very similar to the parent, as long as they did not cross with another variety.
- F1 hybrids are crosses between two different parent lines. Their seed will grow, but the offspring are unpredictable. You may get a mix of plant sizes, flavors and fruit shapes, often worse than the original.
For seed saving, start with open-pollinated varieties.
The easiest seeds to start with
These crops mostly pollinate themselves, so they rarely cross with neighbors, and their seeds are easy to collect.
| Crop | Pollination | Isolation needed | Difficulty |
|---|---|---|---|
| Beans | Self | Very little, a few meters | Very easy |
| Peas | Self | Very little | Very easy |
| Lettuce | Self | A few meters | Easy |
| Tomatoes | Mostly self | A few meters between varieties | Easy |
| Peppers | Self, but bees can cross them | 10+ meters, or bag flowers | Moderate |
Crops like squash, cucumbers, corn, carrots and the cabbage family cross easily with other varieties and often need large isolation distances or hand pollination. Leave those until you have some experience.
Choose the right parent plants
Save seed from your healthiest, most productive plants, with the flavor and traits you want more of. Avoid plants that bolted early or showed disease. Whenever possible, collect from several plants of the same variety rather than just one, which keeps more genetic variety in your seed.
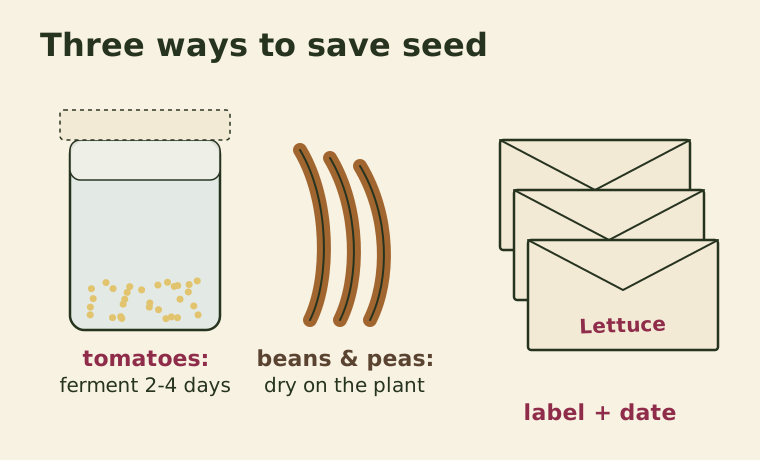
Method 1: Dry seeds (beans, peas, lettuce)
These are the simplest, because the seed dries on the plant.
Beans and peas
- Leave some pods on the plant well past the eating stage, until they turn brown, dry and papery and the seeds rattle inside.
- If rain or frost threatens, pull the whole plant and hang it upside down somewhere dry and airy.
- Shell the seeds and spread them on a plate for another week or two.
- They are dry enough when a seed shatters rather than dents when you tap it with a hammer.
Lettuce
- Let a few plants bolt and flower. They send up a tall stalk with small yellow flowers.
- About two to three weeks after flowering, the seed heads turn fluffy, like small dandelion clocks.
- Shake or rub the heads into a paper bag every few days, since they ripen over time.
- Sift out the fluff and chaff using a kitchen sieve.
Method 2: Fermentation (tomatoes)
Tomato seeds are covered in a gel that contains germination inhibitors. Fermenting removes the gel and may reduce some seed-borne diseases.
- Pick a fully ripe, even slightly overripe tomato.
- Squeeze the seeds and gel into a small glass jar and add a little water.
- Cover loosely with a cloth and leave it at room temperature for 2 to 4 days. A layer of white mold will form on top. This is normal and smells bad.
- Add more water and stir. Good seeds sink. Pour off the mold, pulp and floating seeds.
- Rinse the seeds several times in a sieve.
- Spread them on a ceramic plate or coffee filter (not paper towel, which they stick to) and let them dry for about a week.
Method 3: Wet seeds (peppers)
- Let peppers ripen fully to their final color, usually red, orange or yellow, and leave them a few extra days.
- Cut them open and scrape the seeds onto a plate.
- Dry for one to two weeks in a warm, shaded spot.
Wear gloves when handling hot pepper seeds and avoid touching your eyes.
Storage: dry, cool and dark
Seeds stay alive longest when they are dry, cool and away from light.
- Store fully dried seed in paper envelopes inside an airtight container, such as a reused glass jar.
- Add a small packet of silica gel or a spoonful of dry rice wrapped in tissue to absorb moisture.
- Keep the jar in a cool, dark cupboard, or in the refrigerator. Avoid places with big temperature swings.
- Label each envelope with the variety, date and where it grew.
Under good conditions, tomato seed can stay viable for 5 years or more, beans and peas for about 3 to 4 years, and lettuce for 2 to 3 years. Onion and parsnip seed is short-lived and best used the following season.
Test before you sow
To check older seed, do a simple germination test.
- Place 10 seeds on a damp paper towel.
- Fold it, put it in a plastic bag and keep it warm.
- After a week or so, count how many sprouted.
If 8 out of 10 sprout, the seed is fine. If only 4 or 5 sprout, sow more thickly than usual. Fewer than that, and it is time to save a fresh batch.
When spring comes around, your saved seed goes straight into the trays from our indoor seed starting guide, and the cycle begins again.
Keep reading
-
 Growing Food
10 Easiest Vegetables to Grow for Beginners (and How Not to Kill Them)
Ten forgiving crops for a first vegetable garden, with spacing, time to harvest and the one mistake to avoid for each.
-
 Reuse & Upcycling
15 Practical Ways to Reuse Glass Jars Around the House
How to remove labels and smells from jars, plus fifteen genuinely useful second jobs for them in the kitchen, garden and workshop.
-
 Growing Food
How to Start Seeds Indoors: From Tray to Transplant
Containers, seed-starting mix, light, water and timing. A step-by-step guide to raising strong vegetable seedlings on a windowsill or under a lamp.