
How to Grow Potatoes in Bags, Buckets and Containers
Grow a real potato harvest on a balcony or patio. Container size, seed potatoes, the layering method, watering and how to know when to harvest.
On this page
Potatoes are one of the most rewarding crops to grow in a container. They need no garden bed, harvesting is as easy as tipping out the pot, and there is no digging to accidentally slice through the crop. A single large bag on a sunny balcony can produce a couple of kilograms of potatoes.
The key is choosing the right container, starting with healthy seed potatoes and adding soil in stages as the plants grow.
What you need
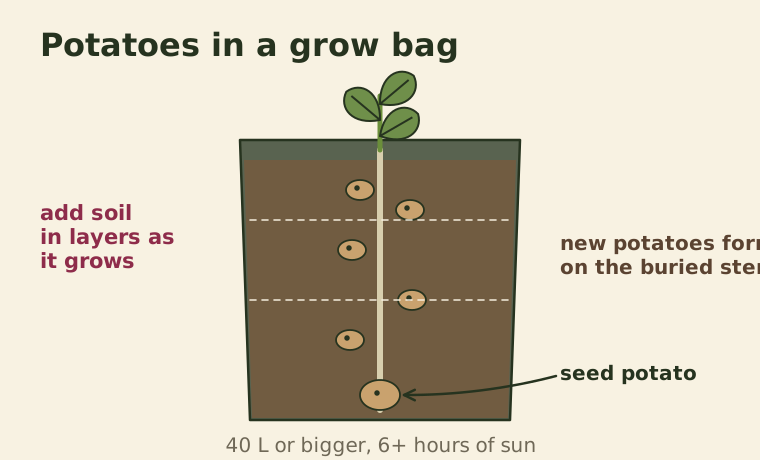
- A container of at least 40 liters, with drainage holes. Fabric grow bags, large buckets, old compost bags, and storage tubs all work. Bigger is better.
- Seed potatoes, sold at garden centers in late winter and spring.
- Potting mix: a blend of compost and potting soil, with some coco coir or leaf mold to hold moisture.
- A sunny spot that gets at least six hours of direct sun.
Why use seed potatoes?
Potatoes from the supermarket will often sprout and grow, as we describe in our guide to regrowing kitchen scraps. However, they may have been treated to stop sprouting, and they can carry viruses and diseases. Certified seed potatoes are inspected and disease-free, so they give more reliable and larger harvests.
Choosing a variety
Potatoes are grouped by how long they take to mature:
| Type | Time to harvest | Container suitability | Examples of use |
|---|---|---|---|
| First earlies | 10–12 weeks | Excellent | New potatoes, salads |
| Second earlies | 13–15 weeks | Very good | Salads, boiling |
| Maincrop | 16–20 weeks | Possible, smaller yields | Baking, mashing, storage |
Early varieties are best for containers. They grow faster, need less space and are harvested before late-season diseases like blight take hold.
Chitting (optional)
A few weeks before planting, stand seed potatoes in an egg carton with the end that has the most eyes facing up. Keep them in a cool, bright place, out of direct sun. Short, sturdy green or purple shoots will form. This is called chitting, and it gives earlies a head start. It's not essential, though.
Planting: the layering method
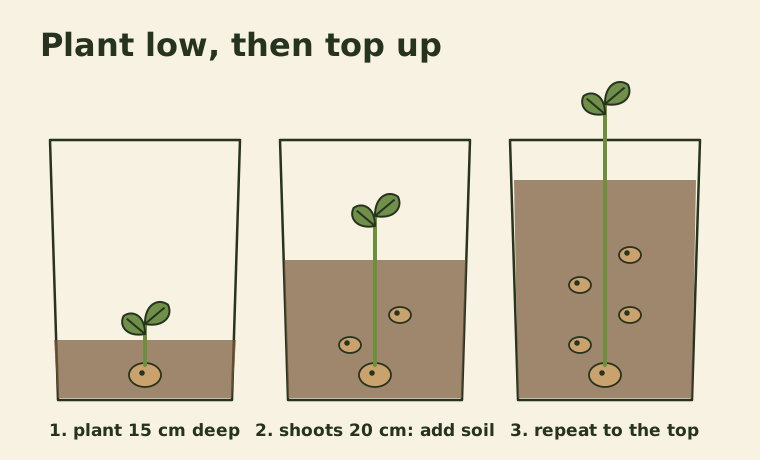
- Add about 15 centimeters of potting mix to the bottom of the container.
- Place the seed potatoes on top, shoots pointing up. Use three seed potatoes in a 40 liter bag, or four or five in a larger one.
- Cover with another 10 centimeters of mix and water well.
- Wait for shoots to grow about 15 to 20 centimeters tall.
- "Earth up": add more mix around the stems until only the top few leaves are showing.
- Repeat each time the plants grow another 15 to 20 centimeters, until the container is full to about 5 centimeters below the rim.
New potatoes form along the buried stems, so adding soil in stages makes room for more tubers. It also keeps them covered, which matters: potatoes exposed to light turn green and develop solanine, a natural toxin. Never eat green potatoes.
Watering and feeding
Containers dry out much faster than garden soil, and potatoes need steady moisture, especially while the tubers are forming.
- Check daily in warm weather. Water when the top few centimeters are dry.
- Water deeply until water runs out of the bottom.
- Avoid soggy soil, which causes rot. Good drainage is essential.
- Feed every two weeks once the plants are growing well, with a balanced liquid feed or a potassium-rich one such as comfrey tea.
Common problems
Blight. Brown patches on leaves that spread quickly in warm, wet weather, especially in late summer. Remove affected leaves promptly. Growing early varieties usually avoids the worst of it. Don't grow potatoes next to tomatoes, which get the same disease.
Green potatoes. Caused by light reaching the tubers. Keep them covered with soil.
Leggy, pale plants. Not enough sun. Move the container to a brighter spot.
Scab. Rough, corky patches on the skin, more common in alkaline or dry soil. It is cosmetic; peel the patches off.
When and how to harvest
- Early varieties: harvest when the plants start to flower, or shortly after, usually 10 to 12 weeks after planting.
- Maincrop: wait until the foliage turns yellow and dies back.
To check, push your hand into the side of the container and feel for potatoes. Take a few "new potatoes" early if you like and leave the rest to grow.
For the full harvest, tip the container out onto a tarp and sort through the soil. It's satisfying, and children usually love helping. Let potatoes for storage dry on the surface for a few hours, then store them in a cool, dark, dry place.
Reusing the soil
After harvest, spread the used potting mix on a garden bed or add it to the compost. Avoid growing potatoes or tomatoes in the same mix next year, as diseases can carry over. It can be refreshed with compost and used for leafy greens or beans instead.
A small-space crop rotation
Potatoes fit neatly into a container rotation. Grow early potatoes in spring, then use the same bag of refreshed soil for bush beans or lettuce in summer. For more ideas on pot sizes, soil mixes and watering, see our complete guide to growing vegetables in containers.
Keep reading
-
 Growing Food
Companion Planting: What Works, What's Folklore, and Easy Pairs to Try
Which plant pairings have real evidence behind them, which are garden folklore, and a simple chart of good and bad neighbors for common vegetables.
-
 Growing Food
Regrow Vegetables From Kitchen Scraps: What Works and What's Just a Nice Idea
Green onions, lettuce, celery, garlic, potatoes and more. Which scraps really regrow into food, how to do it, and what to expect from each.
-
 Small-Space Gardening
Growing Vegetables in Containers: Pot Sizes, Soil Mix and Watering
How big each pot should be, how to mix a potting soil that doesn't compact, and a watering routine that keeps container crops healthy.