
How to Start Composting at Home: A Beginner's Setup That Actually Works
Choose a bin, find the right spot, learn the two ingredients that matter, and get your first finished compost in three to six months.
On this page
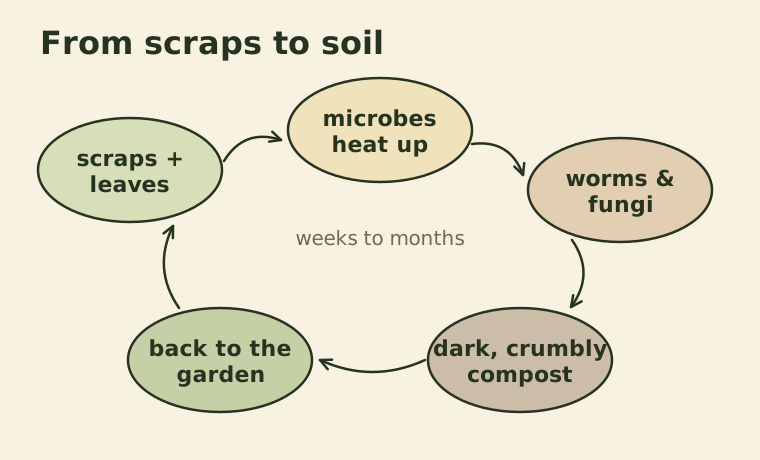
Composting is the slow, mostly hands-off process of letting microbes, fungi and small creatures turn food scraps and garden waste into a dark, crumbly material that plants love. Around a third of what a typical household throws away could go into a compost pile instead. That is less weight in the trash, less methane from landfills, and a free supply of soil conditioner for your pots and beds.
The good news is that composting is forgiving. You do not need special equipment or a big garden. You need a container, a balance of two kinds of material, a little water and some patience. This guide walks through the setup step by step, then covers what to add, what to leave out, and how to tell when it is ready.
Pick the right type of bin for your space
There is no single best bin. The right one depends on how much waste you produce, how much room you have and how much effort you want to put in.
| Bin type | Best for | Time to finished compost | Effort |
|---|---|---|---|
| Open pile or wire ring | Large yards with lots of leaves | 6 to 12 months | Low |
| Closed plastic bin | Small yards and patios | 4 to 8 months | Low to medium |
| Tumbler | People who want faster results | 2 to 4 months | Medium (turning) |
| Worm bin | Apartments and balconies | 3 to 4 months | Low (feeding) |
| Bokashi bucket | Kitchens with meat and dairy scraps | 2 weeks to ferment, then burial | Low |
If you are unsure, a closed bin of around 300 liters is a sensible first choice. It keeps animals out, holds moisture, and is big enough to heat up a little. Apartment dwellers should look at our worm bin guide, since worms handle kitchen scraps indoors without smell when they are looked after.
Choose a good spot
Place an outdoor bin directly on soil rather than concrete when you can. Contact with the ground lets worms and other decomposers move in on their own, and excess water drains away. Partial shade is ideal: full sun dries the pile out in summer, and deep shade keeps it cold and soggy in winter.
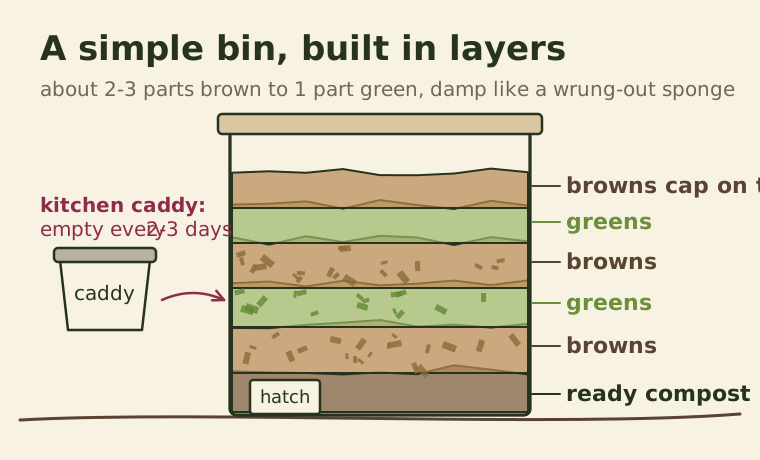
Think about convenience as well. A bin that is a long walk from the kitchen is a bin you will stop using in the rain. Keep a small lidded caddy on the counter or under the sink, and empty it into the main bin every two or three days.
Learn the two ingredients: greens and browns
Everything you add falls roughly into one of two groups.
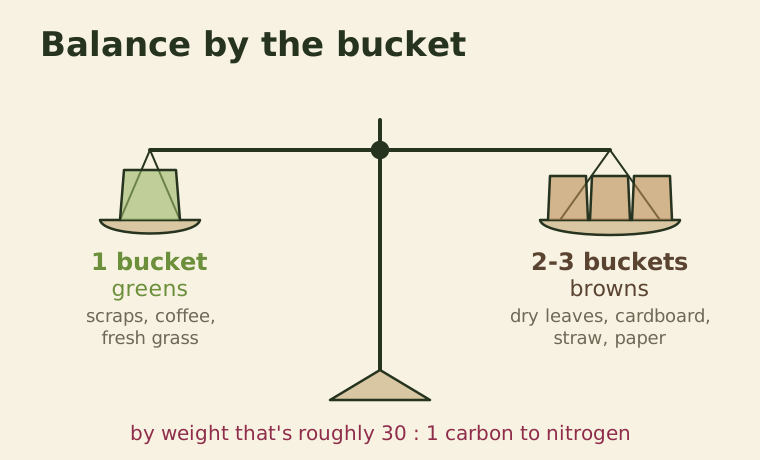
Greens are moist and rich in nitrogen. They feed the microbes and make the pile heat up. Examples include vegetable and fruit scraps, coffee grounds, tea leaves, fresh grass clippings and plant trimmings.
Browns are dry and rich in carbon. They give the pile structure, trap air and soak up excess moisture. Examples include dry leaves, shredded cardboard, plain paper, straw, wood chips and sawdust from untreated wood.
A useful rule of thumb is two to three parts browns for every one part greens, measured by volume (a bucket of scraps, two or three buckets of leaves or torn cardboard). We go into the details, and why the numbers differ between sources, in our guide to the green and brown ratio.
What to leave out
Some materials cause smells, attract pests or carry problems into your garden. In a standard home bin, avoid:
- Meat, fish, bones and dairy, which attract rats and dogs and smell as they rot.
- Cooking oil and greasy food, which coat other materials and slow everything down.
- Pet waste from cats and dogs, which can carry parasites.
- Diseased plants and weeds that have gone to seed, because a home pile rarely gets hot enough to kill them.
- Glossy or coated paper, and anything labeled "compostable" plastic unless you know your pile runs hot. Most of those products are designed for industrial facilities.
- Charcoal ash and coal ash. Small amounts of plain wood ash are fine.
If you want to deal with meat and dairy scraps too, a bokashi bucket can ferment them first. The fermented material is then buried in soil or added to the center of a hot pile.
Build the first layers
- Start with a coarse layer of twigs or straw about 10 centimeters deep. This lets air move up from the bottom.
- Add a thick layer of browns, then a layer of greens, and repeat.
- Sprinkle a couple of shovels of garden soil or old compost over the top. This adds the microbes that get things started.
- Water each layer lightly so that the whole pile feels like a wrung-out sponge.
- Finish with browns on top. A brown cap hides fresh scraps from fruit flies and keeps odors down.
From then on, every time you add kitchen scraps, cover them with a handful or two of browns. Keeping a bag of dry leaves or a box of torn cardboard next to the bin makes this a habit instead of a chore.
Keep it working: air, water and turning
Microbes need air and water just as much as food. Check the pile once a week by pushing your hand or a stick into the middle.
- Too wet and smelly? Add browns and mix them in. A sour or rotten-egg smell almost always means too many greens and not enough air.
- Too dry and nothing happening? Add water and some fresh greens, then mix.
- Fine, but slow? Turn the pile with a garden fork every two to four weeks. Moving the outside material to the middle speeds things up a lot.
When is compost finished?
Finished compost is dark brown, crumbly and smells like a forest floor. You should not be able to recognize most of the original ingredients, although eggshells and avocado pits often survive. In a closed bin you can usually harvest from the bottom after four to eight months.
Let it rest, or "cure", for two to four weeks before using it around young plants. Sift out large chunks with a simple screen made from hardware cloth and put them back in the bin to keep going.
How to use your compost
- Mix one part compost with two or three parts soil when planting containers.
- Spread a layer 2 to 5 centimeters thick over vegetable beds each spring.
- Use it as a mulch around shrubs and trees, keeping it a few centimeters away from stems and trunks.
- Brew it into a liquid feed. Our compost tea guide explains how.
A simple first-month checklist
- Choose a bin type that matches your space.
- Set it on soil in partial shade, close to the kitchen.
- Collect browns in advance: a few bags of leaves or a box of cardboard.
- Build the base layers and water them.
- Add scraps and always cover them with browns.
- Check moisture weekly and turn every few weeks.
Start small and do not worry about perfection. Even a neglected pile turns into compost eventually. The care you put in only changes how fast it happens.
Keep reading
-
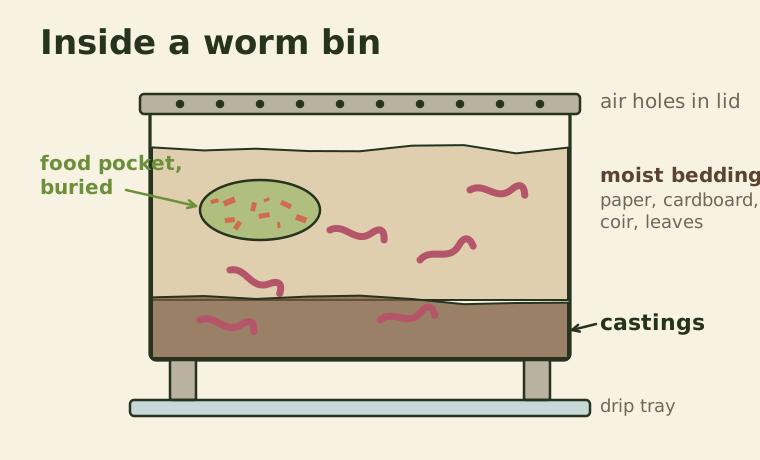 Composting
Vermicomposting for Beginners: How to Set Up and Run a Worm Bin
A worm bin turns kitchen scraps into rich castings indoors or on a balcony. Here's how to build one, feed it, and keep it from smelling.
-
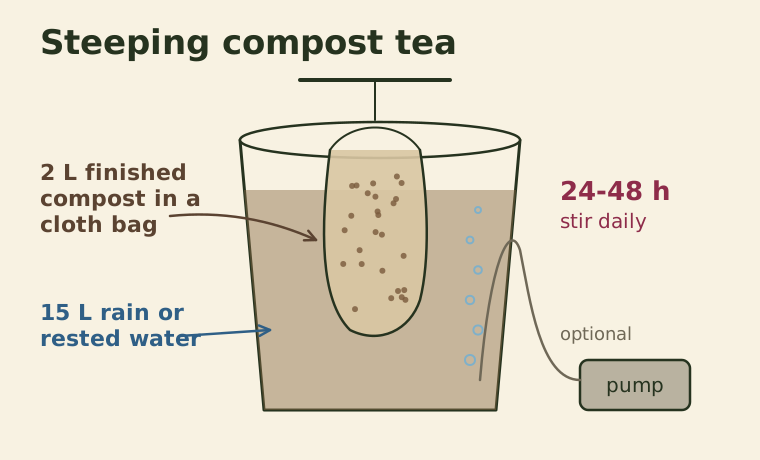 Natural Fertilizers
How to Make Compost Tea: Simple Steeped and Aerated Methods
Two ways to turn finished compost into a liquid feed, how to dilute and apply it, and the hygiene rules that keep it safe for food crops.
-
 Composting
The Green and Brown Compost Ratio, Explained Without the Math Headache
Why the 30:1 carbon to nitrogen number confuses people, how to translate it into buckets, and how to fix a pile that smells or won't heat up.