
Bokashi Composting: How to Ferment Food Scraps, Including Meat and Dairy
How a bokashi bucket works, what you need, the step-by-step routine, what to do with the fermented scraps and how to tell a good batch from a bad one.
On this page
Bokashi is a way of treating kitchen scraps that works very differently from a compost pile. Instead of letting microbes break food down with air, you seal it in a bucket with bran that has been inoculated with beneficial microbes, mainly lactic acid bacteria. Over about two weeks the scraps ferment, a little like sauerkraut. The result is not finished compost yet, but a pickled, acidic material that breaks down very quickly once it is buried in soil or added to a compost pile.
Its big advantage is that it handles the foods a normal home compost bin should not take: cooked leftovers, small amounts of meat and fish, dairy and bread. It also fits under a kitchen sink and, when done right, smells sour rather than rotten.
How bokashi works
The word bokashi comes from Japanese and is usually translated as "fermented organic matter". The process relies on three conditions:
- No air. The microbes involved are mostly anaerobic or tolerate low oxygen. Pressing scraps down and keeping the lid closed is essential.
- Acidity. As lactic acid bacteria work, the pH drops sharply. The acidic environment stops the bacteria that cause rotting and bad smells.
- The right microbes. Bokashi bran (wheat bran, rice bran or sawdust inoculated with effective microorganisms) adds a large starter population so fermentation wins the race against spoilage.
What you need
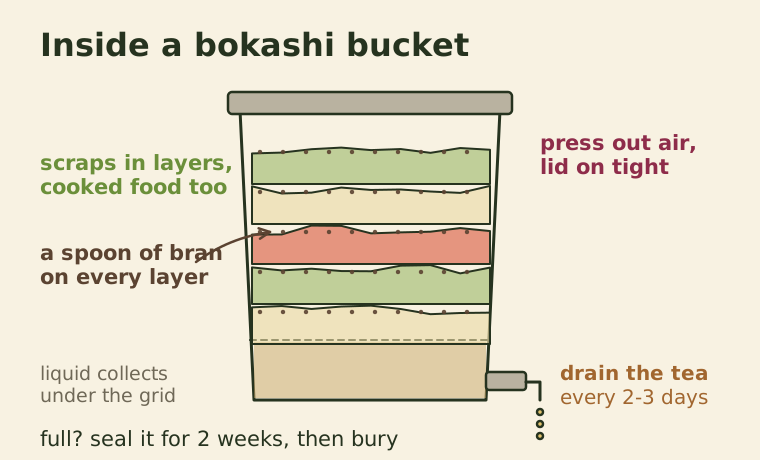
- Two bokashi buckets. These are airtight buckets with a tight lid, a raised inner floor or grid, and a tap at the bottom to drain liquid. Two let you fill one while the other ferments.
- Bokashi bran. Sold by garden suppliers. You can also make your own, but starting with bought bran is easiest.
- A press or potato masher to squeeze out air.
- A small container for collecting scraps through the day.
A homemade version can be made from two stacked food-grade buckets with holes drilled in the bottom of the inner one and a tight-fitting lid on top. Liquid drains into the lower bucket.
What can go in
| Yes | In small amounts | No |
|---|---|---|
| Fruit and vegetable scraps | Meat and fish, cooked or raw | Liquids like milk, soup, juice |
| Cooked leftovers, rice, pasta | Cheese and dairy | Moldy food that's already rotten |
| Bread, cereal, coffee grounds | Bones (they ferment but don't break down) | Large bones, shells, pits |
| Eggs and eggshells | Citrus peel | Plastic, packaging, paper napkins |
| Tea leaves (no plastic bags) | Oily food | Pet waste |
Chop large pieces into chunks about 2 to 3 centimeters across. Smaller pieces ferment more evenly and press down better.
Step-by-step routine
- Start with a layer of bran across the bottom of the bucket, about a tablespoon or two.
- Add scraps as you collect them, ideally once a day rather than a little at a time, so you open the lid less often.
- Sprinkle bran over each layer. A rough guide is one to two tablespoons per 2 to 3 centimeters of scraps. Use more for meat, fish or dairy.
- Press down firmly with a masher or a plate to push out air.
- Close the lid tightly. You can also lay a plastic bag or plate directly on top of the scraps to cut air contact further.
- Drain the liquid from the tap every two or three days. This liquid is often called bokashi tea.
- When the bucket is full, add a final generous layer of bran, close it and leave it to ferment for two weeks at room temperature. Start filling the second bucket meanwhile.
How to tell if it's working
Good signs: a sour, pickled, slightly sweet or cider-like smell. A white, cotton-like mold on the surface is a healthy sign of fermentation.
Bad signs: a putrid, rotten smell, or black, green or blue mold. This means air got in, too little bran was used, or liquid was not drained. A small patch can be scraped off and covered with extra bran. A whole bucket that smells rotten is best buried deep in the garden or added to the middle of an active compost pile with plenty of browns.
What to do with the fermented scraps
After two weeks, the scraps will look much the same as when they went in, just softer and pickled. They still need to finish breaking down in soil.
Trench method: dig a trench or hole about 20 to 30 centimeters deep, add the fermented material, mix it with some soil and cover it completely. In warm conditions it disappears within two to four weeks. Wait about two weeks before planting directly into that spot, because the material is acidic while it breaks down.
Soil factory: fill a large pot or tub halfway with old potting soil, mix in the bokashi, top with more soil and leave it for a few weeks. You end up with rich soil for containers, which suits balcony gardeners.
Compost pile: add it to the center of a compost pile and cover it with browns. It speeds up the pile and adds nitrogen.
Worm bin: small amounts can go into a worm bin, but the acidity can bother worms. Mix in some crushed eggshell and add it to one corner only.
Using bokashi tea
The liquid drained from the tap is rich in nutrients and microbes, and it is strongly acidic.
- As a plant feed: dilute it heavily, about 1 part tea to 100 parts water (roughly a teaspoon per liter), and use it within a day of draining. Apply to soil, not leaves.
- For drains: undiluted bokashi tea can be poured down kitchen and bathroom drains, where it is often said to help reduce buildup. Do not pour it into septic systems in large amounts without checking.
Common questions
Do I have to buy bran forever? Many people make their own by mixing bran with a liquid microbial culture and molasses, fermenting it in a sealed bag and drying it. It is cheaper but takes some practice.
Does it smell? A well-run bucket smells sour when you open it and nothing at all when closed. Most problems come from too little bran or not draining the liquid.
Can I do bokashi without a garden? Yes, with the soil factory method in a container, or by giving the fermented material to a community garden or a friend's compost.
Bokashi is a useful partner to regular composting rather than a replacement. Together they let almost all food waste from the kitchen go back into the soil instead of the bin, which is the core idea of our guide to reducing food waste.
Keep reading
-
 Zero Waste Home
How to Reduce Food Waste at Home: Plan, Store, Use Up
Where household food waste comes from, how to shop and store to prevent it, what date labels really mean, and how to use up scraps before composting.
-
 Composting
Vermicomposting for Beginners: How to Set Up and Run a Worm Bin
A worm bin turns kitchen scraps into rich castings indoors or on a balcony. Here's how to build one, feed it, and keep it from smelling.
-
 Composting
How to Start Composting at Home: A Beginner's Setup That Actually Works
Choose a bin, find the right spot, learn the two ingredients that matter, and get your first finished compost in three to six months.