
Visible Mending for Beginners: Darning, Patching and Sashiko-Style Stitches
Repair holes, tears and worn spots in clothes with three simple techniques, the basic kit you need and how to choose the right fix for each fabric.
On this page
A hole in a favorite sweater or a worn knee in a pair of jeans does not have to be the end of them. Visible mending is the practice of repairing clothes in a way that shows the repair, often in a contrasting color, instead of trying to hide it. It is easier than invisible mending, it suits beginners, and the result can look better than the original.
Keeping clothes in use for longer is one of the most effective ways to cut the environmental footprint of what we wear. Making new clothes uses large amounts of water, energy and raw materials, so every year of extra wear counts.
A basic mending kit
You do not need much:
- Needles: a few sizes, including a darning needle (large eye, blunt tip) for wool and a sharp embroidery needle for woven fabric.
- Thread: cotton embroidery floss or sashiko thread for visible stitching; wool or darning yarn for knits.
- Fabric scraps for patches. Old shirts, jeans and worn-out t-shirts are perfect.
- Small sharp scissors.
- Pins or small clips.
- A darning egg or mushroom, or simply a lightbulb, a smooth stone or a jar lid, to stretch the fabric while darning.
- A thimble, optional but helpful when pushing through denim.
Choose the right technique
| Damage | Fabric | Best technique |
|---|---|---|
| Small hole (under 2 cm) | Knitwear, socks | Darning |
| Thin, worn patch, no hole yet | Knitwear | Swiss darning (duplicate stitch) or darning |
| Hole or tear | Denim, cotton, linen | Patch with running stitches |
| Large worn area | Denim knees, elbows | Patch from behind, sashiko-style stitching |
| Split seam | Any | Simple backstitch along the seam line |
| Moth holes in a sweater | Wool | Darning, or embroidered motif over the hole |
Fix damage early. A thin spot is much easier to reinforce than a hole, and a small hole is far easier than a large one.
Technique 1: Darning (for knits and socks)
Darning weaves new yarn across a hole, recreating a patch of fabric.
- Stretch the area over a darning egg or a lightbulb, so the fabric is smooth but not distorted.
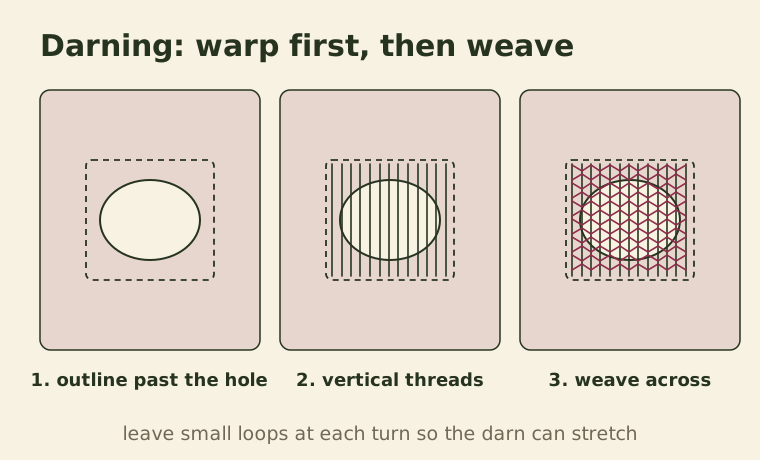
- Outline the area. Work about 1 centimeter beyond the edge of the hole, into the healthy fabric, where the knit is still strong.
- Make vertical stitches. Starting at one corner, run the needle in and out of the fabric in a straight line, then across the hole to the healthy fabric on the other side. Turn and come back, leaving a small loop at each turn so the darn can stretch. Continue until the hole is covered in parallel lines.
- Weave horizontal stitches. Now go across at right angles, passing the needle over and under the vertical threads alternately, like weaving a basket. Each row alternates the over-under pattern of the previous one.
- Finish by running the yarn through the back of the darn for a few centimeters, rather than tying a knot, which can rub.
Use yarn of a similar weight to the original. A darn in a contrasting color makes a cheerful feature.
Technique 2: Patching with running stitches (for denim and cotton)
- Trim loose threads around the hole, but do not cut it bigger.
- Cut a patch at least 2 centimeters larger than the damaged area on every side. Use a fabric of similar or slightly lighter weight.
- Decide inside or outside. A patch behind the hole gives a subtle look, with the old fabric framing the patch. A patch on top is bolder and protects the area more.
- Pin or baste the patch in place.
- Stitch around the edge of the patch with small running stitches, about 3 to 5 millimeters long.
- Add rows of running stitches across the whole patch, about 5 to 10 millimeters apart. This anchors the worn fabric to the patch and spreads the stress. For jeans, stitch in the same direction as the leg so the knee can bend.
Technique 3: Sashiko-style reinforcement
Sashiko is a Japanese tradition of decorative reinforcing stitches. Its simplest form is evenly spaced running stitches in a grid or pattern, often in white thread on dark cloth.
- Mark straight lines with chalk or a washable marker, about 5 to 10 millimeters apart.
- Use a long needle and load several stitches onto it before pulling through.
- Keep stitches even: the gaps between stitches are often slightly shorter than the stitches themselves.
- Leave a little slack in the thread at the end of each row so the fabric can move.
Sashiko-style stitching works brilliantly on worn denim knees, thinning elbows and frayed cuffs, and it can be combined with a patch behind.
Simple fixes everyone should know
- Sewing a button back on: use doubled thread, go through the holes six to eight times, then wrap the thread around the stitches under the button a few times before knotting. This "shank" leaves room for the buttonhole.
- Fixing a split seam: turn the garment inside out, and stitch along the original seam line with a backstitch, starting and finishing a centimeter beyond the split.
- Stopping a ladder in a sweater: catch the loose loop with a safety pin until you can darn it.
Care to prevent damage
- Wash wool gently, in cold water, and dry it flat.
- Store knitwear clean and folded, with cedar or lavender to discourage moths.
- Turn jeans inside out and wash them less often.
- Treat small problems immediately, before they spread.
When repair isn't enough
Some clothes really are beyond saving. Before throwing them out, see if they can become something else: rags, plant ties, patches for other garments or a tote bag, as described in our guide to upcycling old t-shirts. Fabric that is completely worn out should go to a textile recycling bank, never the household recycling bin, as explained in our list of common recycling mistakes.
A well-mended garment carries its own history. The first repair takes a little practice, but after a few, you will find yourself looking at holes as a small, satisfying project rather than the end of the line.
Keep reading
-
 Reuse & Upcycling
What to Do With Old T-Shirts: 8 No-Sew and Simple-Sew Upcycling Projects
Turn worn-out t-shirts into bags, rags, yarn, plant ties and more, plus how to decide what to donate, upcycle or send to textile recycling.
-
 Recycling
12 Common Recycling Mistakes That Send Good Material to Landfill
Wishcycling, bagged recyclables, greasy boxes and tiny items. The errors that contaminate recycling and how to fix each one.
-
 Zero Waste Home
12 Zero Waste Kitchen Swaps That Are Actually Easy to Keep Up
Simple replacements for the most common disposables in the kitchen, ordered from easiest to more committed, and the habits that make them stick.